Collage Cards: How to Compose With Paper Scraps
Build an original collage card from your own paper scraps: tear and cut the pieces, layer them from back to front, glue thinly and press flat. Includes a torn-paper landscape to follow.
Tutorial at a glance
Materials
- White cardstock panel, 3.75 x 5 in (9.5 x 12.7 cm)
- Paper scraps in pink, navy, cobalt, mint and yellow
- Mat, 4 x 5.25 in (10.2 x 13.3 cm)
- A2 card base
- Glue stick or liquid glue
- Scissors
- Scrap paper
- A heavy book for pressing
Collage cards are made by arranging pieces of paper into a picture or pattern and gluing them down in layers. They suit anyone with a box of offcuts, because irregular scraps are an advantage here: a torn edge becomes a hillside, a narrow sliver becomes a horizon. No two come out the same.
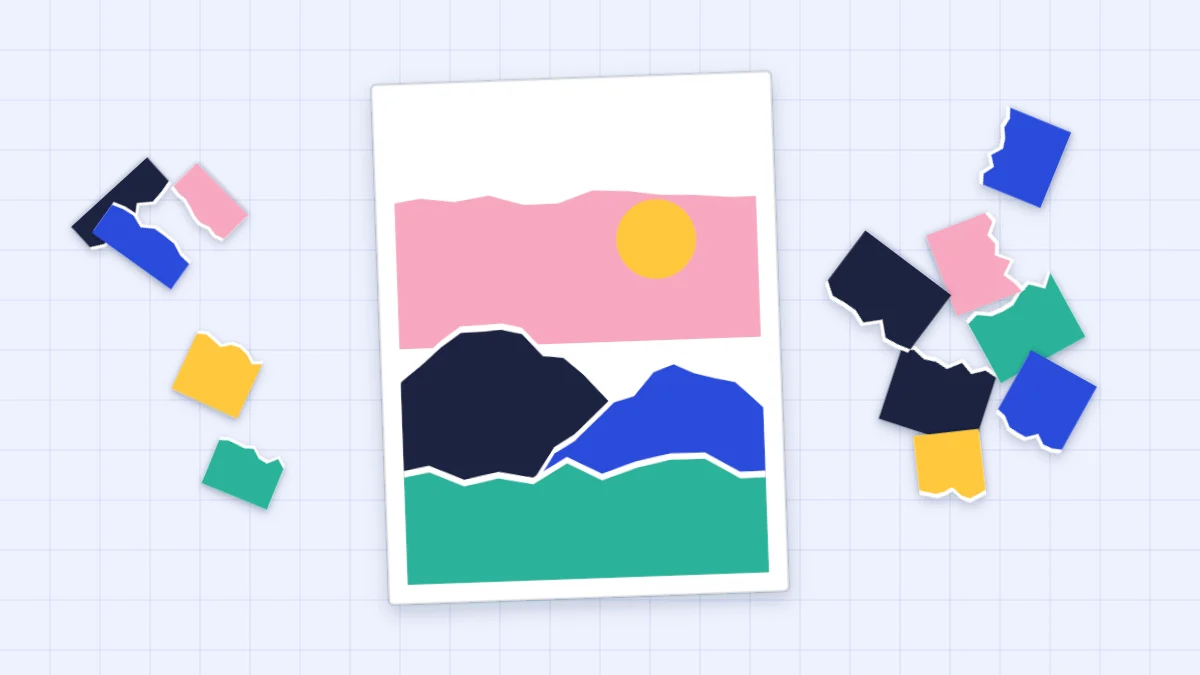
The method is to build from the back of the picture to the front, arrange everything dry, and use very little glue. A torn-paper landscape on an A2 card, 4.25 x 5.5 in (10.8 x 14 cm), is the worked example below.
Papers to collect, and what to leave out
Almost any paper you own outright and that carries no one else’s artwork can go into a collage:
- Cardstock offcuts in solid colors, the backbone of most collages.
- Paper you decorated yourself: brushed with watercolor or poster paint, dotted with a pen, or printed with homemade stamps.
- Security-envelope insides. The fine blue or gray patterns printed inside many business envelopes make good texture.
- Tissue paper, which is translucent and can be layered to mix colors.
Watch out
Use only your own papers or paper that is free to use. Do not cut characters, logos, photographs or artwork from magazines, packaging, books or printed cards. Those images belong to someone else, and a collage built from them is not an original design.
What you need for the landscape card
- A white cardstock panel, 3.75 x 5 in (9.5 x 12.7 cm)
- Scraps in pink, navy, cobalt, mint and yellow; all but the yellow at least 4 in (10 cm) wide
- A mat, 4 x 5.25 in (10.2 x 13.3 cm), and an A2 card base
- A glue stick, or liquid glue and a scrap of card to spread it
- Scissors, scrap paper and a heavy book
With A4 paper, fold half a sheet for the base and cut the mat and panel to leave the same narrow borders.
Building the collage from back to front
A collage is layered like scenery on a stage. Whatever is furthest away goes down first and is partly covered by everything nearer. Working in this order means the lower edge of each piece can be rough, because the next piece hides it.
- Sky. Tear a pink band about 1.5 in (4 cm) deep and a little wider than the panel. Place it across the upper part of the panel, leaving some white above it as open sky.
- Far hills. Tear a navy piece with a gently rising top edge. Lay it so it overlaps the bottom of the pink band.
- Near hills. Tear a cobalt piece with a different slope and overlap it on the navy, lower down, so both blues show.
- Foreground. Tear a mint piece for the bottom of the panel, overlapping the cobalt hill.
- Sun. Cut a yellow circle about 3/4 in (2 cm) across. This small focal piece goes on last, in the sky to one side of center.
Each piece should overlap the one behind by at least 1/4 in (6 mm) so no white panel shows through by accident, and should run past the panel’s side edges. Slopes that tilt in opposite directions look more natural than hills that run parallel.

Torn edges versus cut edges
How you separate a piece of paper changes its character as much as its color does.
| Feature | Torn edge | Cut edge |
|---|---|---|
| Look | Soft, feathery, irregular | Crisp and exact |
| Good for | Hills, clouds, water, sky bands | Suns, buildings, stems, geometric shapes |
| Control | Approximate; each tear is different | Precise; shapes can be repeated |
| Tool | Fingers, or a ruler to tear against | Scissors or a craft knife |
Many colored papers have a white core beneath the colored surface. When you tear such a sheet, the pull exposes the core along one side of the tear as a soft white line. Pull the part you are discarding toward you and the white shows on the piece you keep; pull it away and the edge stays colored. That white line is useful, since it outlines a hill against the layer behind it. Solid-core cardstock tears to the same color all the way through.
Tear slowly, moving your fingers along the tear a short distance at a time; a fast rip runs off in a direction you did not choose. Mixing both kinds of edge works well: torn shapes for the land and a cleanly cut circle for the sun.

Arrange dry, then glue thin
Lay out the whole picture without glue first. Move the pieces around, re-tear any that are the wrong shape, and check that there is breathing room: an area of plain sky or plain foreground where nothing happens. A collage in which every part is busy has no focal point, and it leaves nowhere to write a short greeting on the front. For help choosing which colors sit together, see the guide to card color combinations.
When the arrangement works, lift the pieces off in reverse order and set them down in a row so you know the sequence. Then glue them back one at a time, starting with the sky.
- Put each piece face down on scrap paper and apply glue from the center out over the edges. Torn edges need glue right to the tip of the feathering or they curl up.
- Keep the layer thin and even. Thick glue soaks into the paper, which then swells and dries with wrinkles. Spread liquid glue with a scrap of card until it is barely shiny.
- Smooth each piece from the middle outward through a clean sheet of paper.
- Tissue is the exception: put the glue on the panel, lay the tissue onto it and pat it down gently, since wet tissue tears when rubbed.
Pressing, trimming and mounting
Cover the finished collage with clean paper and leave it under a heavy book until the glue is completely dry. Pressing keeps the panel from curling as the damp layers shrink.
Turn the dry panel face down and trim off everything that overhangs, cutting along the panel’s own edges with scissors or a craft knife. A craft knife is an adult tool; cut on a cutting mat and away from the holding hand. Glue the trimmed panel to the mat and the mat to the card base, keeping the borders even as described in the guide to layering cardstock.
Write the greeting by hand in a quiet area of the panel or inside the card. Before the card goes in its envelope, the checks in finishing a handmade card help you catch glue smears and lifted edges.
Frequently asked questions
What paper can I use for a collage card?
Use plain cardstock offcuts, paper you painted or patterned yourself, the patterned insides of security envelopes, tissue and kraft paper. Avoid cutting characters, logos or artwork from printed products, because those images belong to someone else.
Why does my collage wrinkle?
Wrinkles come from too much wet glue, which makes paper swell and then dry unevenly. Spread a thin, even layer, smooth each piece from the center outward and press the finished panel under a heavy book until the glue is completely dry.
How do I get a white edge when tearing paper?
Use paper with a white core and pull the part you are discarding toward you as you tear. The core is exposed on the piece you keep as a soft white line. Pulling the discarded part away from you leaves a colored edge instead.