Spring Card With Paper Tulips
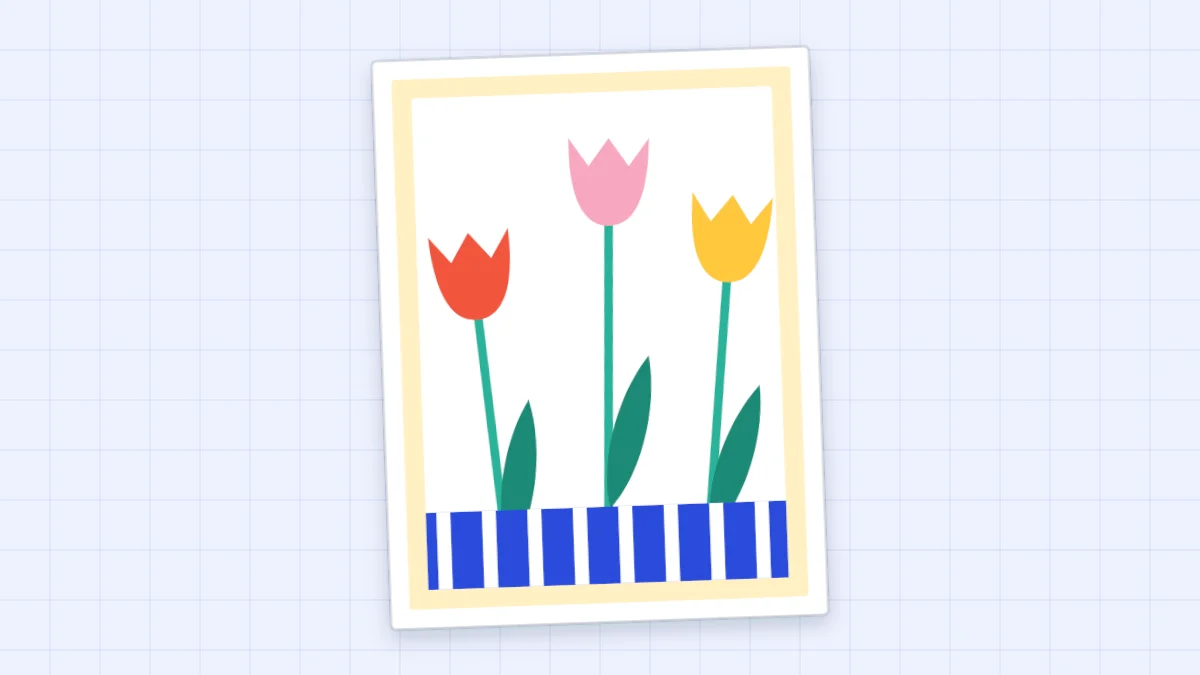
Three paper tulips on stems of different heights rise from a striped band. A cheerful spring card for birthdays, Mother's Day, Easter or a get-well note.
Tutorial at a glance
Materials
- White card base, 8.5 x 5.5 in (21.6 x 14 cm)
- Pale yellow cardstock mat, 4 x 5.25 in (10.2 x 13.3 cm)
- White cardstock panel, 3.75 x 5 in (9.5 x 12.7 cm)
- Cardstock scraps in red, pink and yellow
- Mint or green cardstock for stems and leaves
- Strip of striped paper, 3.75 x 3/4 in (9.5 x 2 cm)
- Scissors, pencil and ruler
- Glue stick or liquid glue
Tulips are one of the easiest flowers to cut from paper: a rounded cup, three points along the top, a straight stem and a long leaf. This spring flower card lines up three of them in red, pink and yellow, rising from a striped band along the bottom of the panel. It suits a spring birthday, Mother’s Day, an Easter greeting or a get-well note, and the handwritten message goes inside.
Two things decide whether the card looks fresh or stiff. The first is cutting each tulip from folded paper, so its two sides match. The second is staggering the heights, so the flowers look as if they grew and were not ruled into place.
What you need
- One white A2 card base: 8.5 x 5.5 in (21.6 x 14 cm), scored and folded to 4.25 x 5.5 in (10.8 x 14 cm)
- Pale yellow cardstock for the mat, 4 x 5.25 in (10.2 x 13.3 cm)
- White cardstock for the panel, 3.75 x 5 in (9.5 x 12.7 cm)
- Scraps in red, pink and yellow, each about 1.5 in (4 cm) square
- A mint or green scrap at least 4 in (10 cm) long for stems and leaves
- A strip of striped paper, 3.75 x 3/4 in (9.5 x 2 cm), or blue paper and a white pen to draw your own stripes
- Scissors, a pencil, a ruler, and a glue stick or liquid glue
Half a US letter sheet makes the base, and half an A4 sheet gives a very similar card. The stems are the only fiddly cut on this card; a paper trimmer or a knife and ruler keeps them straight, as explained in the guide to cutting cardstock cleanly.
Cutting the tulips
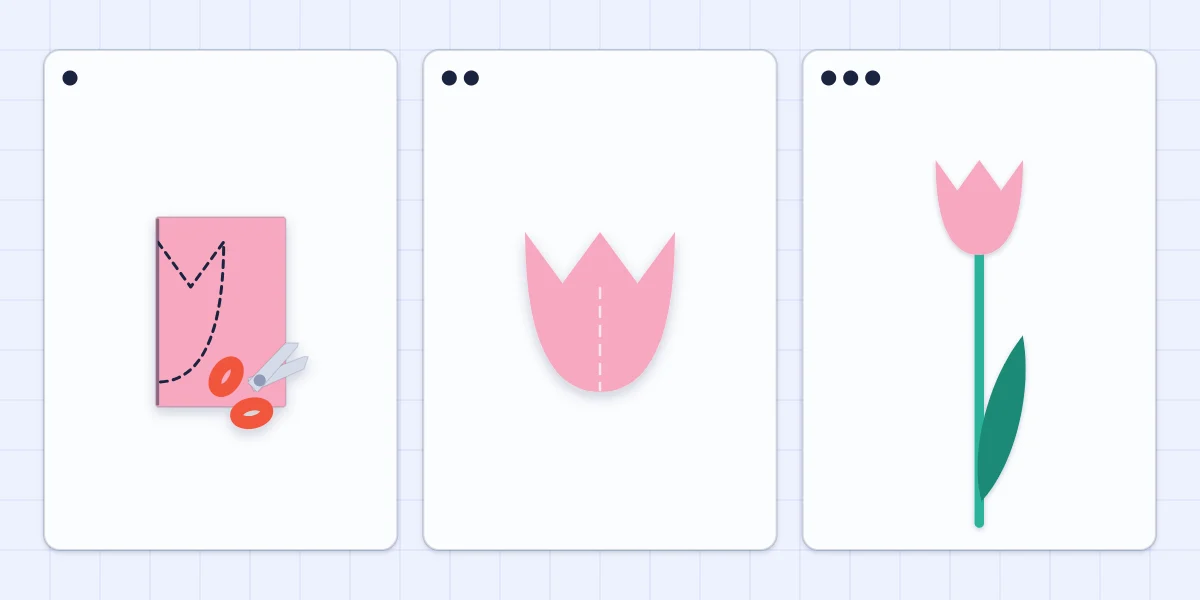
- Fold the scrap. Fold a square of colored cardstock in half with the color inside and crease it well.
- Draw half a cup. With the fold on the left, start at the bottom of the fold and draw a curve that swells out and up, like half of an egg cup, about 1.25 in (3.2 cm) tall and 1/2 in (1.3 cm) out from the fold at its widest.
- Add the zigzag top. From the top of the curve, draw a short line slanting down toward the fold, then back up to meet the fold. Unfolded, this gives three points: one on each side and one in the middle.
- Cut and unfold. Cut the curve in one smooth pass, then snip the zigzag from the outer edge inward. Open the tulip and flatten the crease from the back.
- Repeat in the other colors. Trace the first tulip so all three are the same size, or cut each one fresh for slight natural differences.
If the middle point comes out lower than the side points, the last line did not climb far enough up the fold.
Stems and leaves
Cut three stems about 1/8 in (3 mm) wide. Start with lengths of roughly 2.5, 3.25 and 2.75 in (6.4, 8.3 and 7 cm). A stem that is too thin curls and is hard to glue straight, so do not go much narrower.
The leaves are long and pointed, about 2 in (5 cm) long and 3/8 in (1 cm) across at the widest part. Cut each one from a folded strip so it is symmetrical, or cut a single long curve freehand for a leaf that bends to one side. One or two leaves per stem is enough.
Glue each tulip over the top 1/4 in (6 mm) of its stem so the join is hidden behind the flower. Tuck the base of each leaf against the stem near the bottom and let the tip swing outward.
Staggering the heights
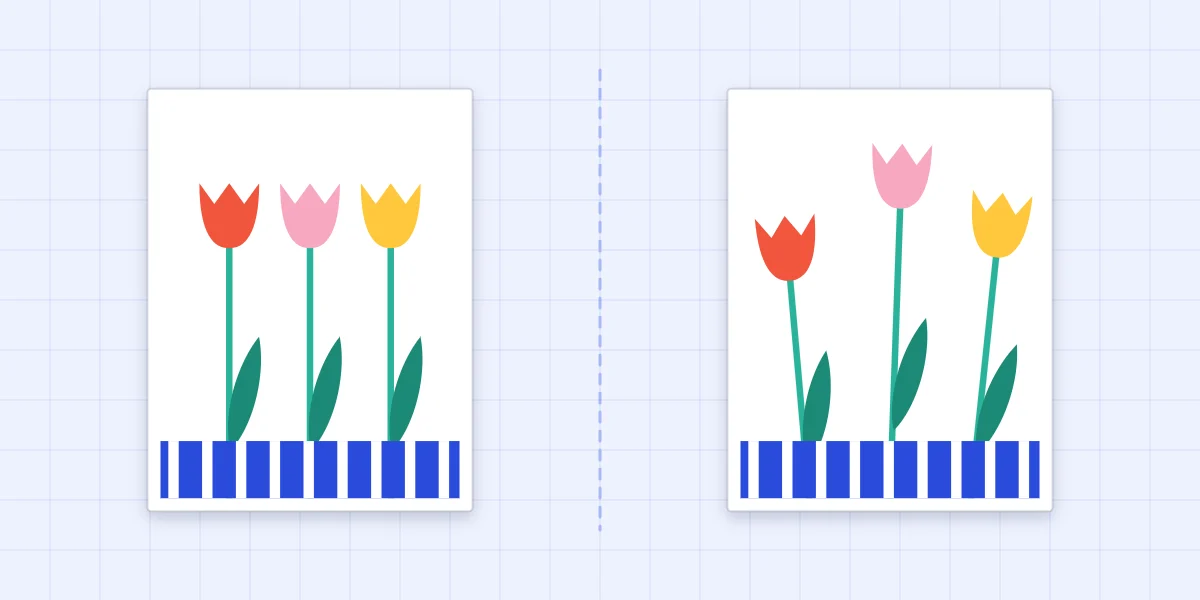
Three tulips of exactly the same height, evenly spaced and bolt upright, look like a fence. Small differences make the group look natural: different stem lengths, uneven gaps, and a slight lean.
| Tulip | Color | Stem length | Lean |
|---|---|---|---|
| Left | Red | About 2.5 in (6.4 cm) | Slightly to the left |
| Middle | Pink | About 3.25 in (8.3 cm) | Upright |
| Right | Yellow | About 2.75 in (7 cm) | Slightly to the right |
Arrange everything dry before gluing. Set the tallest tulip a little off the center line of the panel, then place the other two so the gaps on each side differ. Keep the lean small. A stem tilted by the width of the stem itself is enough; more than that and the flower looks as if it is falling over.
All three stems run off the bottom edge of the panel. Glue the stems first, then the leaves, then the flower heads, pressing each piece down along its full length.
The band along the base
The striped band does two jobs. It hides the cut ends of the stems, which never line up perfectly, and it gives the flowers something to stand in. Glue the band across the bottom of the panel, over the stem ends, flush with the bottom and side edges.
If you have no striped paper, make some. Rule evenly spaced lines across a strip of blue cardstock with a white pen, or glue narrow strips of white paper across it and trim the ends. Vertical stripes echo the stems. Horizontal stripes look calmer.
Assembling the card
Trim any stem ends that poke below the panel, then glue the panel to the pale yellow mat and the mat to the card front. Each layer is 1/4 in (6 mm) smaller than the one beneath, which leaves an even 1/8 in (3 mm) border. The guide to layering cardstock shows how to keep those borders even.
Watch out
The zigzag snips are small and close to the fingers. Supervise children with scissors, and cut the stems for them if you use a craft knife.
Color variations
- One color, three shades. Light, medium and deep pink tulips with a white band for a soft Mother’s Day card.
- All white on kraft. White tulips and green stems on a kraft panel for a quiet get-well note.
- Pastels. Pale yellow, lilac and mint with a patterned band for an Easter greeting.
If you are unsure which colors belong together, lay the scraps side by side first; the guide to choosing card color combinations gives a quick way to test a palette. For a different kind of bloom, the layered paper flower card uses round petals in place of cups.
Frequently asked questions
How do you cut a paper tulip so both sides match?
Fold the paper in half and draw half of the cup shape against the fold, with a short zigzag at the top. Cutting through both layers gives two identical sides and three points when the shape is unfolded.
Why do my paper tulips look stiff on the card?
Flowers of equal height in an evenly spaced row read as a pattern, not a plant. Use three different stem lengths, make the gaps uneven and tilt the outer stems very slightly. Arrange the pieces dry before gluing so you can adjust them.
What can I use if I do not have striped paper for the band?
Draw evenly spaced lines on a strip of colored cardstock with a white or dark pen, or glue narrow strips of contrasting paper across it. A plain band in a color from the flowers also works.