Birthday Banner Card With Paper Pennants
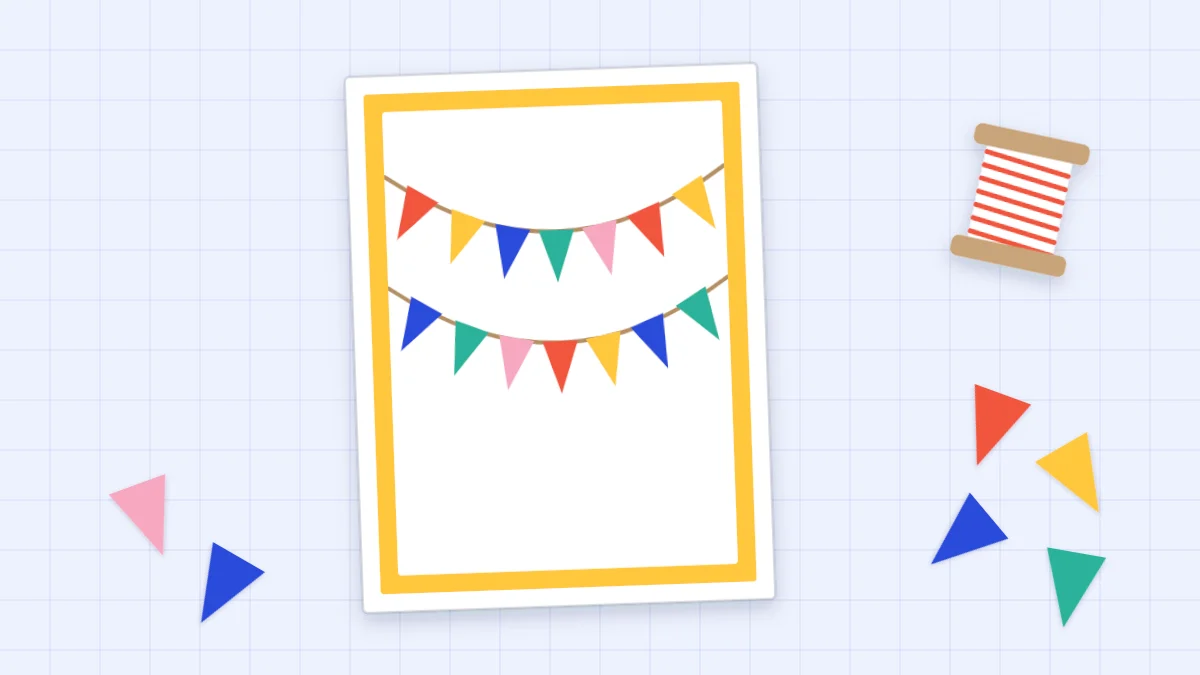
Cut a row of equal paper pennants from scrap strips with one zigzag cut and string them along two swooping lines. The lower third stays free for a handwritten greeting.
Tutorial at a glance
Materials
- A2 side-fold card base in white
- Colored mat, 4 x 5.25 in, and white panel, 3.75 x 5 in
- Cardstock or patterned paper scraps in four or five colors
- Pencil, ruler and scissors
- Fine-tip pen, or thin twine or embroidery thread
- Glue stick
- Liquid glue and tape if using twine
Two strings of tiny paper flags are enough to make a card look like a party. A birthday banner card needs only small triangles, so it is one of the best ways to use the scraps that are too small for anything else, and because every pennant is the same shape, it is easy to make several cards at once.
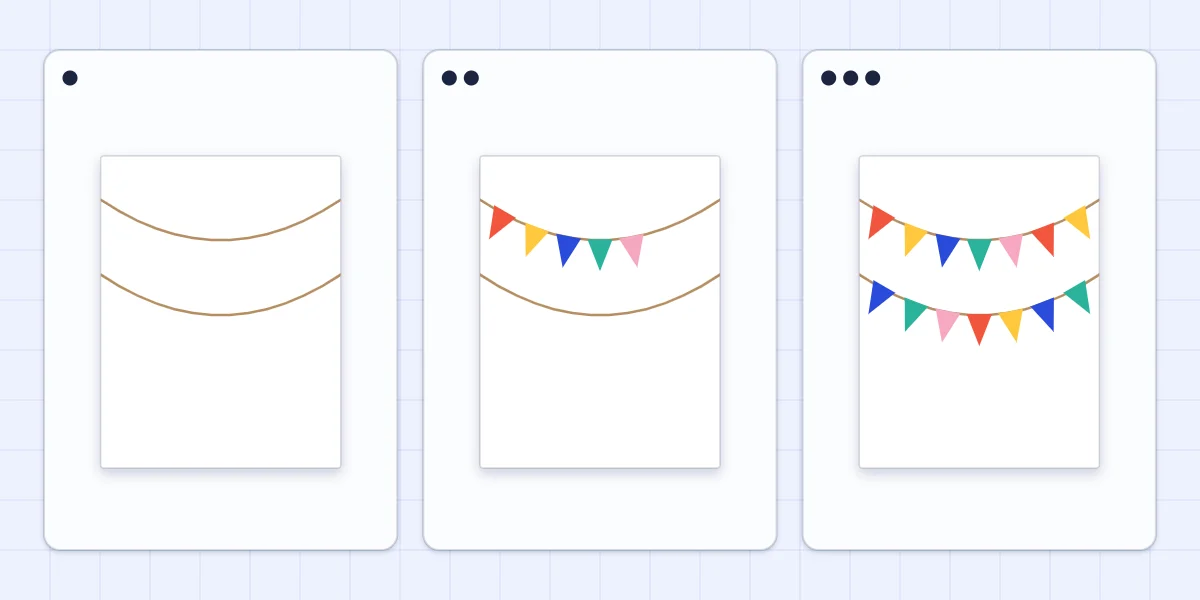
The design sits in the top half of the card: two swooping lines with pennants hanging from them in alternating colors. The lower third stays empty for a handwritten greeting.
What you need
- One A2 side-fold card base in white, 4.25 x 5.5 in (10.8 x 14 cm) when folded
- A colored mat, 4 x 5.25 in (10.2 x 13.3 cm), and a white panel, 3.75 x 5 in (9.5 x 12.7 cm)
- Cardstock or patterned paper scraps in four or five colors
- A pencil, a ruler and scissors
- A fine-tip pen, or thin twine or embroidery thread
- A glue stick, plus liquid glue and tape if you use twine
The base is half a US letter sheet scored down the middle; half an A4 sheet gives a very similar card. Lighter cardstock, roughly 160-220 gsm, is ideal for the pennants because small pieces of heavy stock are hard to cut accurately.
Cut equal pennants from a strip
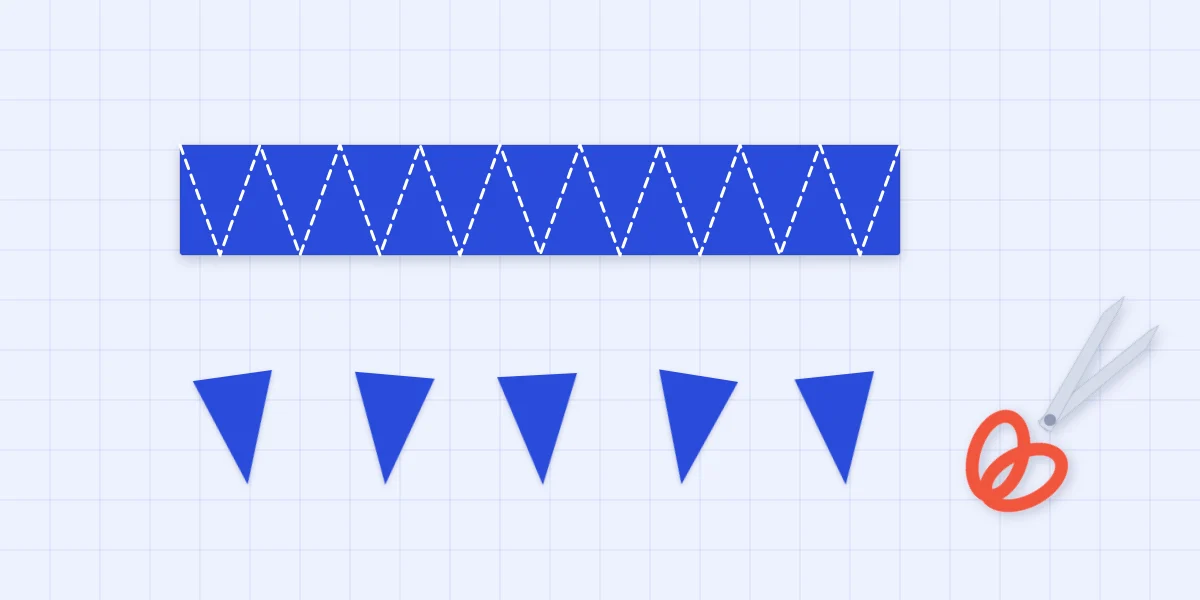
Cutting triangles one at a time gives a different triangle every time. A zigzag cut along a strip gives a whole row of matching ones with no waste.
- Cut a strip 5/8 in (1.6 cm) tall from each color. A strip 3 in (7.6 cm) long yields about ten pennants.
- Along the top edge, make a small pencil tick every 1/2 in (1.3 cm).
- Along the bottom edge, make ticks at the same spacing but shifted sideways by 1/4 in (6 mm), so each bottom tick sits halfway between two top ticks.
- Cut from the first top tick down to the first bottom tick, then back up to the next top tick, and continue in a zigzag to the end of the strip.
Every piece that falls away is the same triangle, alternately pointing down and up, each 1/2 in wide and 5/8 in tall. Glue the pennants with the marked side down to hide the ticks.
You need 12 to 14 pennants for one card. If your scissors wander, the guide to cutting cardstock cleanly has help with short straight cuts.
Draw the lines or use real twine
The banner hangs from two lines that sag in the middle, like string pinned at both ends. Either draw them or glue down real twine.
| Method | How it is done | Result |
|---|---|---|
| Drawn line | Pencil the curve lightly, then trace it with a fine-tip pen | Completely flat; best for batches and mailing |
| Glued twine | Press twine into a thin line of liquid glue, wrap the ends behind the panel and tape them | Slightly raised, with real texture |
| Folded pennants on twine | Fold double pennants over loose twine, then tape the twine ends behind the panel | Like real bunting, but the bulkiest version |
Whichever you choose, work on the loose white panel before it is mounted. Start the first line about 1/2 in (1.3 cm) below the top edge at both sides and let it dip to about 1 in (2.5 cm) in the middle. Start the second about 1.75 in (4.5 cm) down and let it dip to about 2.25 in (5.7 cm). Running the lines right off both edges makes the banner look as if it continues beyond the card.
Tip
To get a smooth curve, bend a strip of scrap cardstock into a shallow arc, hold its ends at the two starting points and trace along it.
Arrange the banner
- Lay the pennants out dry. Place six or seven along the first line with their flat tops touching the line and their points hanging down. Alternate the colors so that no two neighbors match.
- Glue the first line. Start with the pennant at the lowest point of the curve and work outward to both sides. That keeps the spacing even where the eye looks first, and any part-pennant falls at the edge.
- Tilt each pennant with the line. The top of each one follows the slope of the curve at that spot, so the pennants near the ends lean inward slightly.
- Fill the second line in the same way, starting with a different color so the two rows do not line up in matching columns.
- Trim the overhang. Turn the panel face down and cut off any pennant that sticks out past the edge.
Leave a sliver of space between pennants, or the row reads as a solid sawtooth band.
Fold the pennants over twine for a real bunting look
For pennants that wrap over the string, cut the strip twice as tall, 1.25 in (3.2 cm), and fold it in half along its length. Mark and zigzag-cut as before, with the fold as the top edge. The triangles with their flat side on the fold open into diamonds; the others fall apart into two loose triangles that you can save for a flat banner.
Slip each diamond over a length of twine at the fold and glue its two halves together. Lay the garland across the panel, let it sag, and tape the twine ends to the back.
Mount the panel and add the greeting
Glue the panel to the mat and the mat to the card front, keeping the border of 1/8 in (3 mm) even on all sides. Over taped twine ends, use liquid glue or double-sided tape, because a glue stick may not hold over the bump. The guide to layering cardstock shows how to line up mats without measuring each time.
Handwrite the greeting in the empty lower third, in pencil first.
Variations and making a batch
- Scalloped flags. Punch or cut circles about 5/8 in (1.6 cm) across and cut each in half. The straight edge goes on the line.
- Rectangular flags. Cut small rectangles about 3/8 x 5/8 in (1 x 1.6 cm) and snip a V notch into the bottom of each.
- One color family. Three shades of a single color look calmer and suit any occasion.
For a batch, cut and zigzag all the strips, sort the pennants by color, and draw every panel’s lines before gluing anything. The same routine is described for a matching set of cards. Scraps that are long and narrow rather than small are better saved for a paper strip card.
Frequently asked questions
How do I cut lots of small triangles that are all the same size?
Cut a strip as tall as the pennants should be, mark the top edge at even intervals and the bottom edge at the same intervals shifted by half a step. Cut in a zigzag from mark to mark. Every piece is the same triangle, and there is no waste.
Should I draw the banner string or use real twine?
A drawn line is flat, fast and the better choice for batches or cards going in the mail. Real twine adds texture but needs liquid glue, and its ends should be wrapped behind the panel and taped. Both look good, so choose by how much bulk you want.
How many pennants fit on an A2 card?
With pennants about 1/2 in (1.3 cm) wide, six or seven fit along each line on a 3.75 in (9.5 cm) panel, so plan on 12 to 14 for two lines. Cut a few extra in each color so you can alternate freely.